OpenShift
Red Hat OpenShift Container Platform unites developers and IT operations on a single platform to build, deploy, and manage applications consistently across hybrid cloud and multi-cloud infrastructures.
OpenShift Container Platform — platform as a service built around docker containers orchestrated and managed by Kubernetes on a foundation of Red Hat Enterprise Linux.
OpenShift helps businesses achieve greater value by delivering modern and traditional applications with shorter development cycles and lower operating costs.
For more OpenShift Architecture read my previous blog post.
OpenShift On AWS Architecture
Openshift Kubernetes Engine comes with different installation on different platforms like AWS, Azure, Google Cloud, Bare-metal and Vmware. In this post I have simplified each and every steps of the process provision OpenShift Container Platform 4.7 on AWS Infrastructure from scratch.
In this article we are going to provision Three Master and Three worker node cluster on AWS. This OpenShift cluster I recommend for the development environment.
- A single virtual private cloud (VPC) that spans three Availability Zones, with one private and one public subnet in each Availability Zone.
- An internet gateway to provide internet access to each subnet.
- A public, external Network Load Balancer for access to the OpenShift API.
- A private, internal Network Load Balancer for access to the OpenShift API.
- In the private subnets: Three OpenShift master instances. A variable number of worker node instances.
Let’s start!!!, We’ll then dive into the detail of how we can setup cluster on AWS Cloud.
Step 01 : Setting up AWS account
Create IAM user with Administrator Access, If you already have administrator access IAM user you need to download the Access key ID. Go to My Security Credentials => Access keys for CLI, SDK, & API access => Click Create access Key => Download file. Then proceed to the next step.
Login to the AWS using root level user. Navigate to the Identity and Access Management (IAM) ,click Add user.
Add Permissions ,using create group. You can add multiple groups with different permissions.
For the required AWS permissions refer this article.
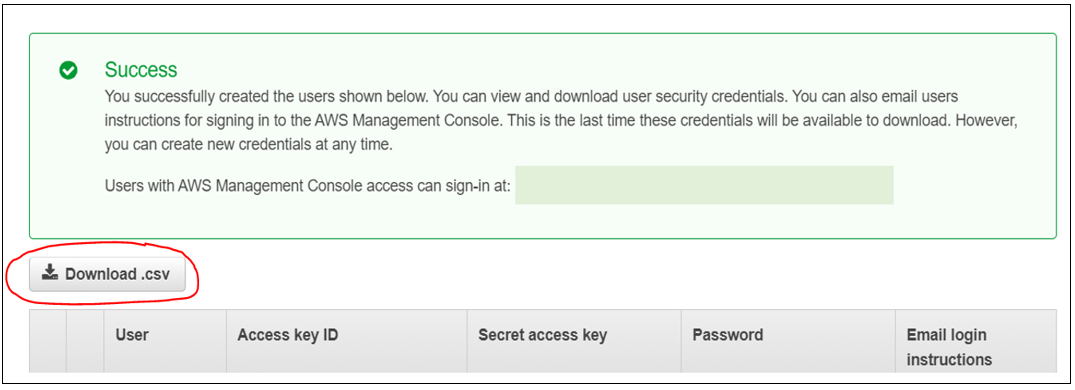
Last part is add a tag and review the user and create user. After create user you can download csv file. It's contain Secret access key and Access key ID .These two keys we need in the next steps. Step 02 : Create public Hosted Zone in AWS
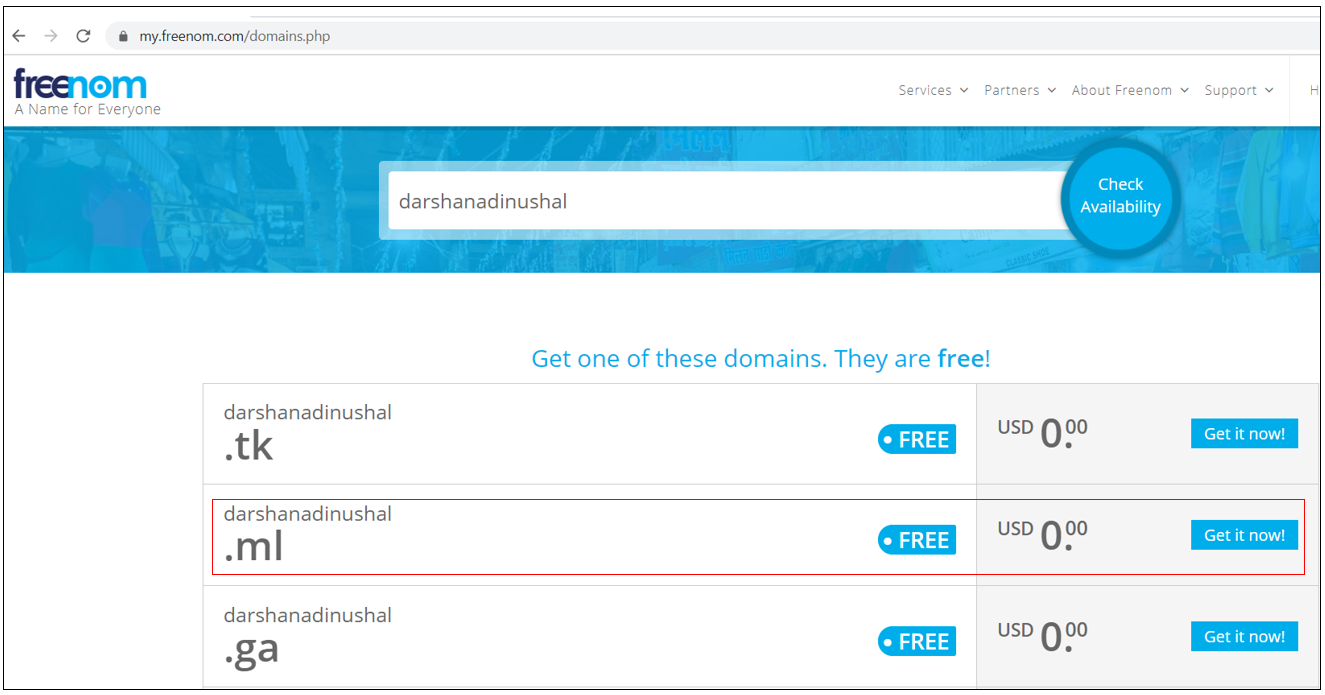
To install Openshift Container Platform, We must need a Domain Name ,for that you can use Route53 service in AWS or any other domain name. In this article I am using free domain name.
* you can create an account in Freenom ,they provide 12 months free domain for you.
Create dedicated public hosted zone using Route 53 service in AWS, This specify how to route traffic on the internet. - When you register a domain with Route 53, AWS create a hosted zone for you automatically.
- When you transfer DNS service for an existing domain to Route 53, you start by creating a hosted zone for the domain.
Navigate to the AWS Route 53 => Hosted zones => create hosted zone.
Copy the Name Server Recodes to your domain name.
Login to the https://www.freenom.com/ => Go to Services => My Domain => Use custom nameservers => Paste NS recodes on by one.
** Note (Remove the last "." of the ns recode)
Step 03 : Setup Jump server (Linux)
This Jump server mine on AWS free tier EC2 instance which act as management server will help to perform AWS CLI and Openshift installer and CLI tasks. You can use any local Linux distribution machine as a jump server.
1. Create AWS EC2 instance
Choose an Amazon Machine Image (AMI).
2. Choose an Instance type For the Configure Instance Details and Add Storage select the default values.
4. Adding a Tags to the EC2
Add a new tag, you can define a tag with key = Name and value = <any-value>.
5. Configure Security Group. For the Configure security group keep the default values ,review details and click the Launch button. Then it will appear to download the Key pair select the "Create a new key pair" in the dropdown menu and provide any name for the "key pair name.
A key pair consists of a public key that AWS stores, and a private key file that you store. Together, they allow you to connect to your instance securely.
Download the Key pair and Launch the Instance.Step 04 : Connect to the Jump server
There are various options that you can use to connect your EC2 instance example using Putty ,GitBash or Web Browser. GitBash is my most loved tool for connecting EC2 Linux
instances. You just need to download (
link) and install it, which is pretty simple.
First we need to connect to EC2 instance , so navigate to the EC2 => Instances => select EC2 instance that we create on the last step => Click the Connect button on the top.
Navigate to the SSH client tap ,copy the URL in the Example section.
To connect using your instance's public DNS name, First open the gitbash terminal and navigate to the <my-key-pair>.pem folder and Paste the in the ssh command that you copy early.
ssh -i /path/my-key-pair.pem my-instance-user-name@my-instance-public-dns-name
Step 05 : Install the AWS CLI
Here we are install version 2 on Linux. Follow these steps from the command line to install the AWS CLI on Linux.
curl "https://awscli.amazonaws.com/awscli-exe-linux-x86_64.zip" -o "awscliv2.zip"
Step 06 : AWS Configure
For general use, the aws configure command is the fastest way to set up your AWS CLI installation. When you enter this command, the AWS CLI prompts you for four pieces of information:
- Access key ID ( Step 1 we download the access key ID and Secret )
- Secret access key
- AWS Region (The region name identifies the AWS Region whose servers you want to send your requests to by default.)
- Output format (The output format specifies how the results are formatted [ json , yaml , text] )
AWS Access Key ID [None]: AKIAV62DSXXXXXXX
AWS Secret Access Key [None]: AcpxFM2YVJ0XXXXXXXXX
Default region name [None]: us-east-2
Default output format [None]: json
Step 07 : Generating a new SSH private key and adding it to the agent
1. Run the below shown command to generate the SSH key that is configured for the password-less authentication.
ssh-keygen -t rsa -b 4096 -N '' -f /home/ubuntu/id_rsa
2. To start the ssh-agent process as a background task, execute the below shown command.
3. Run the below shown command to add the SSH private key to the ssh-agent.
ssh-add /home/ubuntu/id_rsa
Step 08 : Download Openshift installer using user-provisioned Infrastructure
You can install OpenShift with either an installer-provisioned infrastructure (IPI) or user-provisioned infrastructure (UPI). I strongly recommend using UPI for your installation because the IPI makes too many infrastructure assumptions (networking, security) which you wouldn’t easily get from an AWS admin.
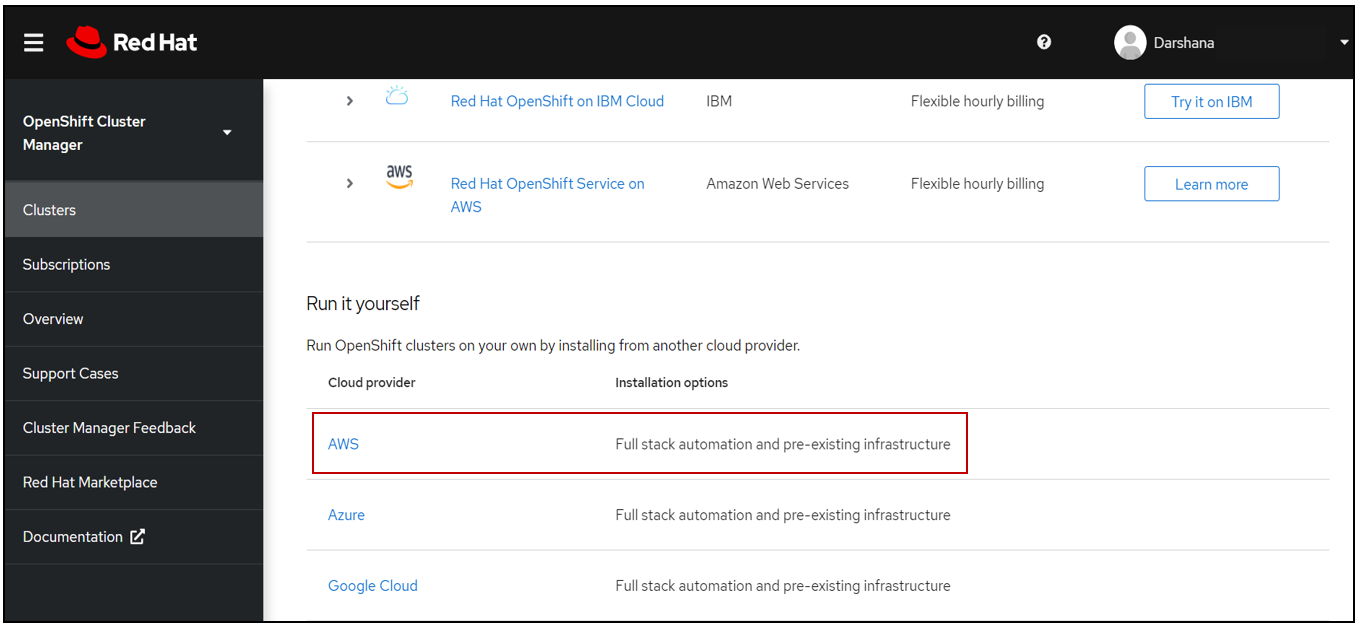
1. Create an account in Red Hat OpenShift (https://www.openshift.com/try) and select Cloud option. After you successfully create OpenShift account you will redirect to the following screen or select Cluster tab in left side and Create Cluster. Then select the AWS.
2. Select User-Provisioned Infrastructure option.
3. Select OpenShift installer. Select Linux in the dropdown and right click on the "Download installer" button and "Copy the link address"
4. Download the installer using wget <Download installer-link >.
wget https://mirror.openshift.com/pub/openshift-v4/clients/ocp/latest/openshift-install-linux.tar.gz
5. Unzip OpenShift installer. Run the following command to unzip openshift installer and copy the files.
Here you can see we installing RedHat Openshift 4.7.2 version . Step 09 : Deploy the Openshift cluster 4.7
Great, Now our environment ready for Openshift cluster installation on AWS Cloud Infrastructure.
1. Create Install config file using following command
openshift-install create install-config
Once you execute command it will ask couple of inputs.
- Cloud Provider :Select the cloud provider aws
- Region :Select the Region ,you can use arrow keys navigate up and down. us-east-2 (US East (Ohio)) .
- Base Domain: Select the Base Domain ,It will show all the domain names that we did in the step 2.
- Cluster Name : provide cluster name any name.
2. Download the pull secrets. Navigate Openshift cluster manager and copy the pull secret (we done the same thing in the step 8).
Copy the pull secret and paste it in the command line and press Enter. After that it will create Install-config.yaml file. 3. Generate SSH private Key. Execute the below command to generate SSH private key shown as below. Then copy the private key, add to the end of the "install-config.yaml" file.
4. Edit the install-config.yaml
Edit the install-config.yaml file using Linux vi command as shown in below .After you edit if you want save file use the :wq command.
|
1
|
Domain Name that we create step 2.
|
|
2
|
Whether
to enable or disable simultaneous multithreading, or hyperthreading. By
default, simultaneous multithreading is enabled to increase the performance
of your machines' cores. You can disable it by setting the parameter value to
Disabled.
|
|
3
|
Aws- Zones –
provide availability zone in your selected region in Step 09-1.
Io1 - To
configure faster storage for etcd, especially for larger clusters, set the
storage type as io1 and set iops to 2000.
|
|
4
|
AWS EC2 instances type
, Use larger instance types, such as m4.2xlarge or m5.2xlarge, for your
machines if you disable simultaneous multithreading.
https://aws.amazon.com/ec2/instance-types/
|
|
5
|
Number of worker
node of the OpenShift Cluster.
|
|
6
|
Number of Master node
of the OpenShift Cluster. In the AWS the minimum number of master instances
are three (one per Availability Zone) .
|
|
7
|
You can
optionally provide the sshKey value that you use to access the machines in
your cluster
|
5. Run the installation program
Use the following command to install the openshift cluster.
openshift-install create cluster --log-level debug
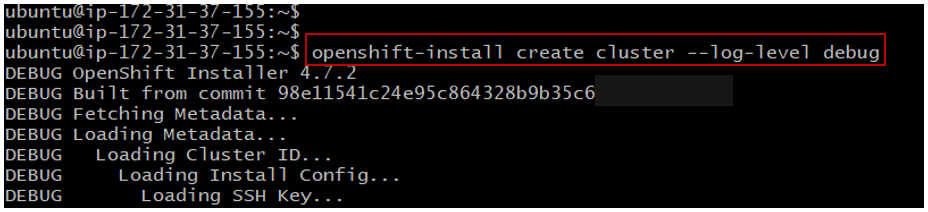
The installation program creates and configures a bootstrap machine with a temporary Kubernetes control plane which then creates and configures the master EC2 instance. Then control plane on the master nodes creates and configures the worker EC2 instance.
It can take approximately 45 minutes to get the complete cluster up and running.
Step 10 : Access the Openshift cluster
Once the OpenShift Installer program install successfully, It will provide URL also Username and Password to login to OpenShift cluster.
After you login to the OpenShift ,you can see OpenShift cluster dashboard.
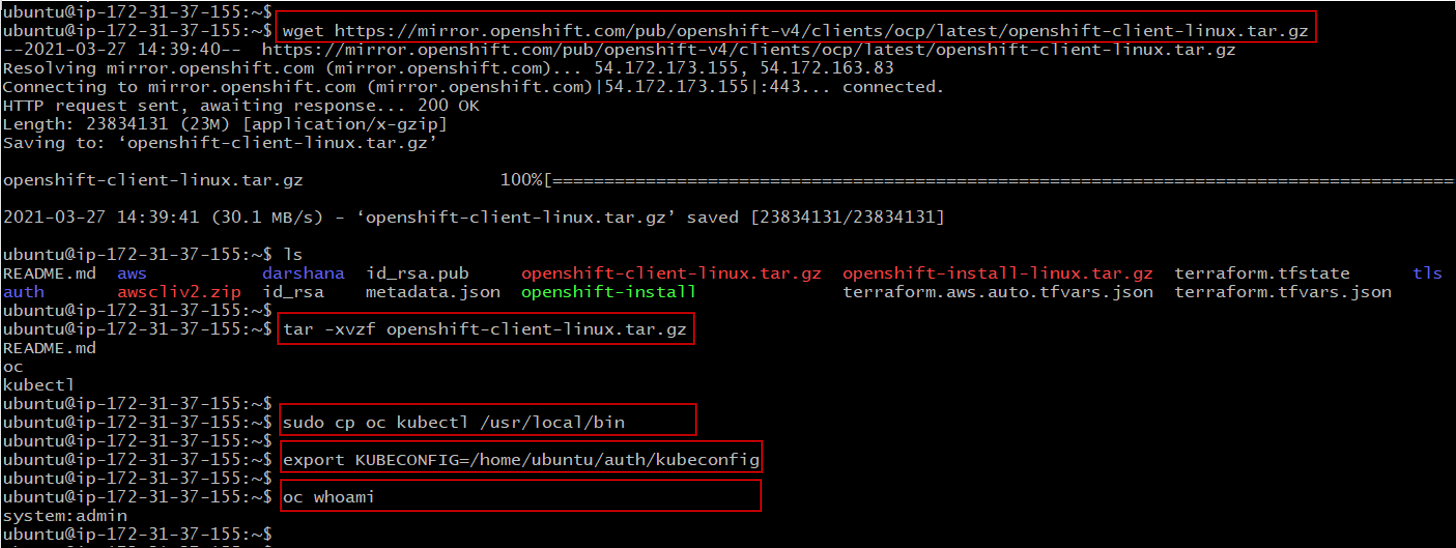
Step 11 : Installing the OpenShift Command-Line Interface Tools
1. When we use jump server to login to the openshift cluster ,we need to install the OpenShift Command-line tool.
Navigate Openshift cluster manager and Select Linux in the dropdown and right click on the "Download command-line tools" button and "Copy the link address" (we done the same thing in the step 8).
2. Download the installer using wget command and run the following commands. wget https://mirror.openshift.com/pub/openshift-v4/clients/ocp/latest/openshift-client-linux.tar.gz
tar -xvzf openshift-client-linux.tar.gz
sudo cp oc kubectl /usr/local/bin/
export KUBECONFIG=/home/ubuntu/auth/kubeconfig
3. Login to the Openshift cluster.
Step 12 : Uninstalling OpenShift cluster on AWS
You can remove a cluster that you installed on Amazon Web Services (AWS) using following command ,it will remove all the resources that used in AWS.
openshift-install destroy cluster --log-level debug
Summary
Congratulations !!! Now you are ready to use the OpenShift cluster that we install Three Availability Zone ? To check the we can Navigate to AWS Console and EC2 section.
You can see total 7 Instances are up and running.
- One for our jump host (Openshift_Instance t2.micro).
- Three m4.xlarge EC2 instance for Master Node running different Availability Zone(us-east-2a ,us-east-2b ,us-east-2c).
- Three m4.xlarge EC2 instance for Worker Node running different Availability Zone(us-east-2a ,us-east-2b ,us-east-2c).
Enjoy!!! stay safe.


Comments
Post a Comment